Manage access to AWS resources
🔎Overview

When deploying applications to AWS, ensuring robust security is Job No:1️⃣, not just to protect user data, but to safeguard internal operations. AWS Identity and Access Management (IAM) provides the foundation for managing authentication and authorization across cloud resources.
Accessing AWS services requires two things:
- Authentication: Verifying the identity of the requester
- Authorization: Granting permission to perform specific actions on resources
👥IAM Principals
This diagram gives an overview of how the main entities within IAM relate to each other: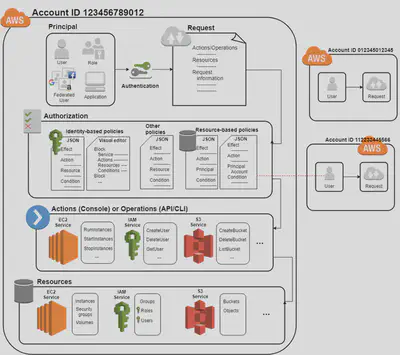
In IAM, a Principal is any entity that can be authenticated and make requests to AWS services. These include:
IAM Users
- Example: Human users like say a
sysadminmanaging different departments with distinct permissions.
IAM Roles
- Example: An
EC2instance assumes a role via the metadata service to access S3 securely.
Applications
- Example:
Containersusing IAM roles for tasks (via ECS Task Roles or IRSA in EKS)
Federated Users
- Example: GitHub OIDC with AWS for CI/CD using GitHub Actions.
- IAM Groups are permission containers, and not Principals. They:
- Organize users
- Allow shared policy management
- Cannot authenticate or make API calls
- Cannot be referenced in resource-based policies
- Cannot associate with a Permission Boundary
👤IAM Users
Individuals with long-term credentials (username/password or access keys). They represent human identities or service accounts created within your AWS account.
- 🔑 Use Credentials
- Username/password for AWS
Consoleaccess - Access keys for programmatic access (
CLI, SDK)
- Username/password for AWS
- 🧠 Use Cases
- Human users (e.g., developers, admins)
- Service accounts for legacy systems
🧢IAM Roles
IAM Roles are temporary identities assumed by trusted entities. IAM Roles operate under two distinct policies, each serving a different purpose:
🤝 Trust Policy (Who Can Assume the Role)
A Trust Policy defines who is allowed to assume the role. It’s attached to the role and evaluated by AWS STS during role assumption.
Trust policies are written in JSON and use the
Principalelement to specify trusted entities.Example: EC2 Trust Policy
{
  "Version": "2012-10-17",
  "Statement": [
    {
      "Effect": "Allow",
      "Principal": {
        "Service": "ec2.amazonaws.com"
      },
      "Action": "sts:AssumeRole"
    }
  ]
}
Assumption Mechanism:
- Use AWS STS (Security Token Service) to retrieve credentials and impersonate the IAM Role you have access to (AssumeRole API)
- Temporary credentials can be valid between 15 minutes to 12 hour
📜IAM Policy – (What the role can do once assumed)
Defines the permissions granted once the role is assumed
Can be inline or managed policies
Controls access to AWS resources
Example: IAM Policy attached to Role
{
  "Version": "2012-10-17",
  "Statement": [
    {
      "Effect": "Allow",
      "Action": "s3:ListBucket",
      "Resource": "arn:aws:s3:::my-secure-bucket"
    }
  ]
}
🧠Use Cases
- EC2 accessing S3 without credentials
- Lambda functions interacting with DynamoDB
- Cross-account access
- CI/CD pipelines assuming deployment roles
🧱Applications
Applications often act as Principals by assuming IAM Roles to access AWS services securely.
- Assume roles via SDK or CLI
- Use environment variables or metadata endpoints
🧠Use Cases
- Backend services calling AWS APIs
- Microservices accessing SQS/SNS
- Containers using IAM roles for tasks (via ECS Task Roles or IRSA in EKS)
🌐Federated Users
Federated users are external identities authenticated via identity providers (IdPs) and mapped to temporary AWS credentials.
- Federation via
sts:AssumeRoleWithSAMLorsts:AssumeRoleWithWebIdentity - Trust policy must reference the IdP ARN.
- Example: GitHub OIDC Trust Policy
{
  "Effect": "Allow",
  "Principal": {
    "Federated": "arn:aws:iam::1234567890:oidc-provider/token.actions.githubusercontent.com"
  },
  "Action": "sts:AssumeRoleWithWebIdentity",
  "Condition": {
    "StringEquals": {
      "token.actions.githubusercontent.com:sub": "repo:my-org/my-repo:ref:refs/heads/main"
    }
  }
}
Federation Types:
- SAML 2.0: Active Directory, ADFS
- OIDC: GitHub Actions, Google Workspace
- Cognito: Mobile/Web app users
🧠Use Cases
- Employees accessing AWS Console via corporate SSO
- CI/CD pipelines assuming roles for deployment
- External partners accessing shared resources
📜IAM Policies
IAM Policies define what actions a Principal👥 can perform and on which resources. They are attached to IAM Users, Roles, or Groups.
By default, all access is denied. Explicit
Allowgrants access;Denyoverrides it.JSON Elements:
Element Description VersionPolicy language version ( 2012-10-17is current)StatementOne or more permission blocks EffectEither "Allow"or"Deny"ActionExplicitly lists API operations to AlloworDeny(e.g."s3:GetObject")NotActionApplies to All API operations Except those listed. ResourceARN(s) of the resources the action applies to ConditionOptional block to refine when the policy applies 🔓Example: AmazonSQSFullAccess (AWS Managed Policy)
Grants full access to all SQS queues in the account.
{
  "Version": "2012-10-17",
  "Statement": [
    {
      "Effect": "Allow",
      "Action": "sqs:*",
      "Resource": "*"
    }
  ]
}
🎯Example: CustomSQSQueuePolicy (Customer Managed Policy)
Scoped limited permissions to a single queue.
{
  "Version": "2012-10-17",
  "Statement": [
    {
      "Effect": "Allow",
      "Action": [
        "sqs:SendMessage",
        "sqs:ReceiveMessage",
        "sqs:DeleteMessage",
        "sqs:GetQueueAttributes"
      ],
      "Resource": "arn:aws:sqs:us-east-2:123456789012:customSqsQueue"
    }
  ]
}
The
Conditionblock allows fine-grained control over when a policy applies. It supports multiple operators and keys.Syntax
"Condition": {
  "{ConditionOperator}": {
    "{ConditionKey}": "{ConditionValue}"
  }
}
Examples:
String Conditions:
"Condition": { "StringEquals": { "aws:PrincipalTag/job-category": "iamuser-admin" } }"Condition": { "StringLike": { "s3:prefix": [ "", "home/", "home/${aws:username}/" ] } }Numeric Conditions
"Condition": {
  "NumericLessThan": {
    "s3:max-keys": "1000"
  }
}
Date Conditions
"Condition": {
  "DateLessThan": {
    "aws:TokenIssueTime": "2025-09-30T00:00:00Z"
  }
}
Boolean Conditions
"Condition": { "Bool": { "aws:SecureTransport": "true" } }"Condition": { "Bool": { "aws:MultiFactorAuthPresent": "true" } }IP Address Conditions
"Condition": {
  "IpAddress": {
    "aws:SourceIp": "203.0.113.0/24"
  }
}
ARN Conditions
"Condition": {
  "ArnEquals": {
    "aws:SourceArn": "arn:aws:s3:::my-bucket"
  }
}
Tag Conditions
{
  "Effect": "Allow",
  "Action": "ec2:CreateVolume",
  "Resource": "*",
  "Condition": {
    "StringEquals": {
      "aws:RequestTag/Env": ["Dev", "Prod"]
    },
    "ForAllValues:StringEquals": {
      "aws:TagKeys": ["Env"]
    }
  }
}
{ "Effect": "Allow", "Action": "ec2:CreateVolume", "Resource": "arn:aws: ec2 :*:*: volume/*",, "Condition": { "ForAllValues: StringEquals": { "aws: TagKeys": ["Env", "CostCenter"] } } }
NotAction:
NotActionis an advanced policy element that explicitly matches everything except the specified list of actions. UsingNotActioncan result in a shorter policy by listing only a few actions that should not match, rather than including a long list of actions that will match.NotActionwithAllow: Allow all actions except the ones listed.PowerUserAccess:
- Provide full access to AWS services and resources, but does not allow management of Users and groups.
- Note how
NotActionis used withAllowinstead ofDeny. Had we usedDeny, the subsequentAllowwould have had no effect.
{ "Version": "2012-10-17", "Statement": [ { "Effect": "Allow", "NotAction": [ "iam:*", "organizations:*", "account:*" ], "Resource": "*" }, { "Effect": "Allow", "Action": [ "account:GetAccountInformation", "account:GetPrimaryEmail", "account:ListRegions", "iam:CreateServiceLinkedRole", "iam:DeleteServiceLinkedRole", "iam:ListRoles", "organizations:DescribeEffectivePolicy", "organizations:DescribeOrganization" ], "Resource": "*" } ] }NotActionwithDeny: Deny all actions except the ones listed.DenyAllUsersNotUsingMFA:
- The following conditional example denies access to non-IAM actions if the user is not signed in using
MFA. - If the user is signed in with MFA, then the “Condition” test fails and the final “Deny” statement has no effect.
{ "Version": "2012-10-17", "Statement": [{ "Sid": "DenyAllUsersNotUsingMFA", "Effect": "Deny", "NotAction": "iam:*", "Resource": "*", "Condition": {"BoolIfExists": {"aws:MultiFactorAuthPresent": "false"}} }] }- The following conditional example denies access to non-IAM actions if the user is not signed in using
🚧Permission Boundaries
Permission boundaries are IAM controls that define the maximum permissions a Principal (user or role) can have—even if their attached policies allow more.
Boundaries are managed policies attached to IAM users or roles
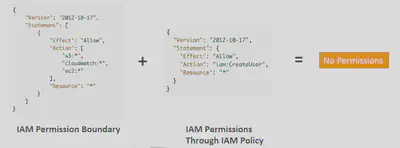
Can be used in combinations of AWS Organizations SCP
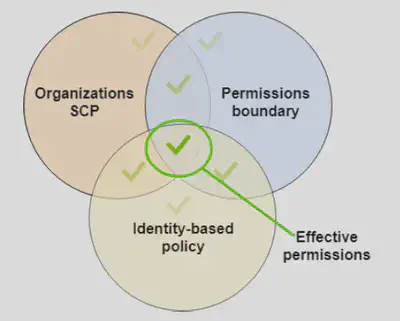
AWS evaluates:
- The permissions policy attached to the principal
- The permission boundary
- Organizational SCP policies
The intersection of the 3 determines the effective permissions
🧠 Use Cases
- Delegate IAM access safely
- Enforce guardrails for automation
- Limit scope of temporary elevated access
🔑STS
AWS Security Token Service (STS) enables you to request temporary, limited-privilege credentials for users.
STSImportant APIs: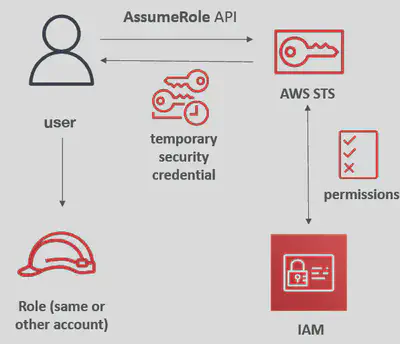
- AssumeRole: access a role within your account or cross-account
- Provide access for an IAM user in your own AWS account or to another AWS account in the same AWS Organization (
Zone of Trust) to access resources. - Provide access to IAM users in AWS accounts owned by third parties
- You can specify
Tagsthat you pass when you assume an IAM Role or federate user in STS. In the corresponding IAM Role then you can use theaws:PrincipalTagCondition to verify.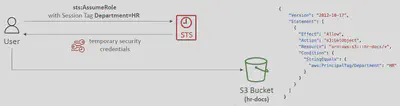
- Your users must actively switch to the role using the AWS Management Console or assume the role using the AWS CLI or AWS API
- You can add multi-factor authentication (MFA) protection to the role.
- Ability to revoke active sessions and credentials for a role (by adding a policy using a time statement –
AWSRevokeOlderSessions) - When you assume a role (user, application or service), you give up your original permissions and take the permissions assigned to the Role
- Provide access for an IAM user in your own AWS account or to another AWS account in the same AWS Organization (
- AssumeRole: access a role within your account or cross-account
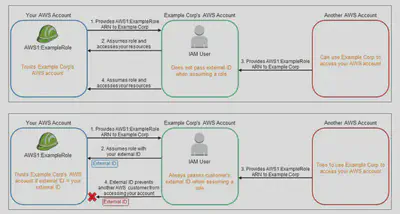
The Confused😕 Deputy:
It’s a security vulnerability where an entity that doesn’t have permission to perform an action can coerce a more-privileged entity to perform the action. To prevent this, you would define an External-ID, an optional identifier that you can use in an IAM role Trust policy to designate who can assume the role. Read more: Confused Deputy
AssumeRoleWithSAML: return credentials for users logged with SAML
- Security Assertion Markup Language 2.0 (
SAML2.0) - Access to AWS Console, AWS CLI, or AWS API using temporary credentials. No need to create IAM Users for each individual employee
- Need to setup a trust between AWS IAM and SAML 2.0 Identity Provider (both ways)
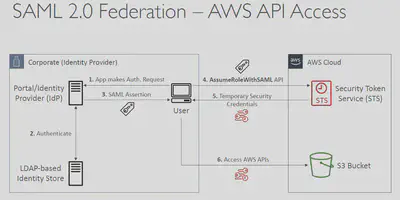
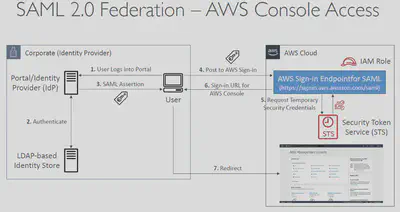
- Security Assertion Markup Language 2.0 (
AssumeRoleWithWebIdentity: return creds for users logged with an IdP
- There could be two patterns:
External
usersgetting federated access. Idp providers include Amazon, Facebook, Google, or any OpenID Connect-compatible identity provider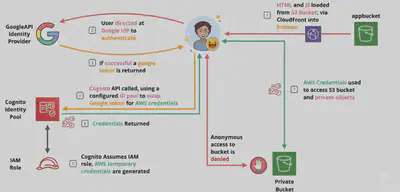
Machine-to-Machine federated access to AWS resources. GitHub OIDC with AWS for CI/CD using GitHub Actions.
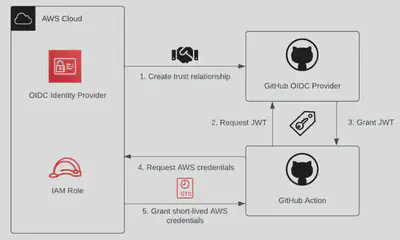
- There could be two patterns:
GetSessionToken: for MFA, from a user or AWS account root user
GetFederationToken: obtain temporary creds for a federated user, usually a proxy app that will give the creds to a distributed app inside a corporate network
🔐Resource Policies
A Resource Policy is an IAM policy that’s attached directly to a Resource instead of to an IAM identity (user, role, or group). It specifies which Principals are allowed to access that resource and what actions they can perform.
- Resource-Based Policies are like saying: “I, the resource, allow you to do this.”
- Resource-based policies live on the resource itself and can grant cross-account access without needing to create roles in the target account.
- Example: Allow read access to all objects in example-bucket for the root user of account
{ "Version": "2012-10-17", "Statement": [ { "Effect": "Allow", "Principal": { "AWS": "arn:aws:iam::123456789012:root" }, "Action": "s3:GetObject", "Resource": "arn:aws:s3:::example-bucket/*" } ] } - Example: Specifies the IAM role in Account-222222222222 that’s allowed to invoke the function in Account-111111111111
{
  "Version": "2012-10-17",
  "Statement": [
    {
      "Sid": "AllowCrossAccountInvoke",
      "Effect": "Allow",
      "Principal": {
        "AWS": "arn:aws:iam::222222222222:role/ExternalLambdaInvokerRole"
      },
      "Action": "lambda:InvokeFunction",
      "Resource": "arn:aws:lambda:us-east-1:111111111111:function:my-function"
    }
  ]
}
🆚IAM Roles vs Resource Policies
Functional Difference
- When you assume an
IAM Role(user, application or service), the Principal gives up his original permissions and takes the permissions assigned by theRole - When using a
Resource-Basedpolicy, the Principal doesn’t have to give up any permissions - 🧠Use Case: User in Account-A needs to scan a
DynamoDBtable in Account-A and dump it in anS3bucket in Account-B.
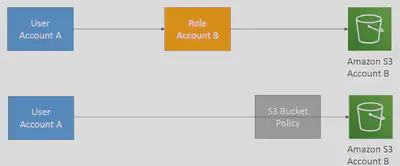
| Feature | Resource-Based Policy | IAM Role |
|---|---|---|
| Attached To | AWS resource (e.g., S3 bucket, Lambda) | IAM entity (role) |
| Who Grants Access | The resource itself | IAM role trust policy + identity-based permissions |
| Cross-Account Access | Directly supported via Principal | Requires trust relationship + assume-role permissions |
| Granularity | Fine-grained per resource | Fine-grained per identity |
| Use Case | Let external accounts/services access your resource | Let internal/external identities assume permissions |
| Management Location | Resource console (e.g., S3, Lambda) | IAM console |
| Scalability | Less scalable (policy size limits) | More scalable and reusable across services |
| Policy Evaluation Context | Evaluated from the resource’s perspective | Evaluated from the identity’s perspective |
| Principal Definition | Explicitly defined in the policy | Defined via trust policy and sts:AssumeRole |
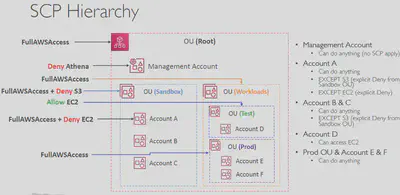
🛣️Service Control Policies (SCP)
- Define Allow or Deny IAM actions
- Applied at the
OUorAccountlevel - Does not apply to the
Management Account - SCP is applied to all the Users and Roles in the account, including Root user
- The SCP does not affect
Service-linkedroles. Service-linked roles enable other AWS services to integrate with AWS Organizations and can’t be restricted by SCPs. - SCP must have an explicit Allow from the root a each OU in the direct path to the target account (does not allow anything by default)
- 🧠 Use cases:
- Restrict access to certain services (for example: can’t use
EMR) - Enforce PCI compliance by explicitly disabling services
- Restrict access to certain services (for example: can’t use
Example: SCP denies all actions in any AWS region that is not eu-west-1 or eu-west-2:
{
  "Version": "2012-10-17",
  "Statement": [
    {
      "Sid": "DenyAllRegionsExceptSpecified",
      "Effect": "Deny",
      "NotAction": [
        "iam:*",
        "aws-portal:*",
        "organizations:*"
      ],
      "Resource": "*",
      "Condition": {
        "StringNotEquals": {
          "aws:RequestedRegion": [
            "eu-west-1",
            "eu-west-2"
          ]
        },
        "ArnNotEquals": {
          "aws:PrincipalArn": "arn:aws:iam::123456789012:role/SecurityAuditorRole"
        }
      }
    }
  ]
}
- The
StringNotEqualscondition checks theaws:RequestedRegionvariable, which specifies the region for the API call. - This policy includes a
NotActionelement for services like IAM, AWS Portal, and Organizations. This is a best practice because these areGlobalservices and a regional Deny would prevent core functions. Because all requests to these services are made to the us-east-1 Region, these requests would get denied without the NotAction element. - We also configure an Auditor Role with the ARN
arn:aws:iam::123456789012:role/SecurityAuditorRole. This role needs to run security scans and compliance checks across all regions, so it must be exempt from the regional restriction.
More SCP Examples
🎭Session Policy
An IAM Session Policy is a way to temporarily limit the permissions of an IAM role or a federated user. Think of it as a temporary filter that’s applied only for the duration of a specific session.
How it works: The final permissions for the session are the intersection of the original IAM policy (the one attached to the role) and the session policy. An explicit
Denyin either policy will always take precedence over anAllow.How you use it: You can’t attach a
Session Policydirectly. Instead, you pass it as a parameter when you programmatically create a temporary session using AWS CLI or an API (likests:AssumeRole).Why Use Them? Session policies are a powerful security tool because they help you enforce the principle of least privilege. Instead of creating a dozen different roles for specific, temporary tasks, you can use one general role and then dynamically “scope it down” with a session policy for each unique task.
🧠Use Case: Imagine you have the All-Powerful AdministratorRole that grants a user full control over your AWS account. You need to give a developer temporary access to only list S3 buckets—and nothing else.
Define a session policy: You create a JSON file that explicitly allows only the
s3:ListAllMyBucketsaction.{ "Version": "2012-10-17", "Statement": [ { "Effect": "Allow", "Action": "s3:ListAllMyBuckets", "Resource": "*" } ] }Apply the policy: You use the aws sts assume-role command and pass that JSON file using the –policy parameter.
aws sts assume-role \
    --role-arn arn:aws:iam::123456789012:role/AdminRole \
    --role-session-name S3-Read-Only-Session \
    --policy file://s3-list-policy.json
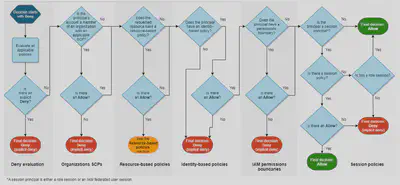
જ⁀➴IAM Policy Evaluation
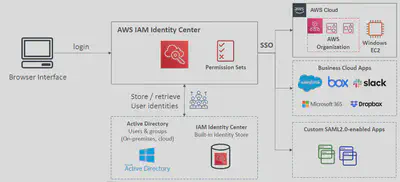
📅IAM Identity Center
A centralized service to manage single sign-on (SSO) access to multiple AWS accounts and business applications across your AWS Organization. It simplifies access management at scale.
- It’s a global service, not tied to a single region.
- It uses
Permission Setsto define and deploy roles across member accounts. - You can either use the built-in IAM
Identity CenterDirectory or connect to an external identity provider (IdP) likeActive Directory,Okta, orAzure AD. - Identity Center automatically provides short-lived, rotating credentials for console, CLI, and SDK access, which is a major security benefit.
⛩️IAM Access Analyzer
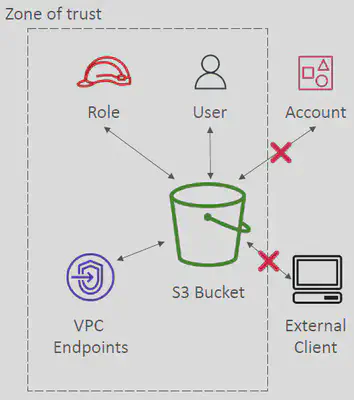
AWS IAM Access Analyzer is a security tool that helps you prevent unintended access to your resources. It continuously monitors your environment and identifies resources that are accessible by external entities outside your defined Zone Of Trust.
- IAM Access Analyzer Policy Validation
- Validates your policy against IAM policy grammar and best practices
- General warnings, security warnings, errors, suggestions
- Provides actionable recommendations
- IAM Access Analyzer Policy Generation
- Generates IAM policy based on access activity
- CloudTrail logs is reviewed to generate the policy with the fine-grained permissions and the appropriate Actions and Services
- Reviews CloudTrail logs for up to 90 days